|
 The principles are much the same as in lesson 1 but this time,
you are using the map to tell you which way is correct instead of your intuition.
The principles are much the same as in lesson 1 but this time,
you are using the map to tell you which way is correct instead of your intuition.
Take a map.
In our first example, we look at a map made for orienteering, and it is very detailed.
Well, not really. We look at a fictitious map I drew myself, but never mind.
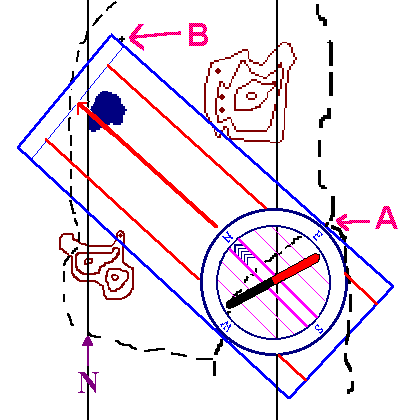
To the point. You want to go from the trail-crossing at A, to the rock at B.
Of course, to use this method successfully, you'll have to know you really are at A.
What you do, is that you put your compass on the map so that the edge of the compass is at A.
The edge you must be using, is the edge that is parallel to the direction of travel arrow.
And then, put B somewhere along the same edge, like it is on the drawing.
Of course, you could use the direction arrow itself, or one of the parallel lines, but usually, it's more convenient to use the edge. At this point, some instructors say that you should use a pencil and draw a line along your course. I would recommend against it. First, it takes a lot of time, but offers no enhancement in accuracy of the method. Second, if you have wet weather, it may destroy your map, or if it is windy, you may loose it. You should keep your map (preferably in a sealed) transparent plastic bag, and if it is windy, tied up, so it can't blow away. But most important is that any drawings may hide important details on the map.
Time to be careful again!
The edge of the compass, or rather the direction arrow, must point from A to B!
And again, if you do t his wrong, you'll walk off in the exact opposite direction of what you want.
So take a second look. Beginners often make this mistake as well.
***********
|