Orienteering skills
This is an overview of basic orienteering skills and how to
teach them as a parent, teacher or youth group leader. It is
also useful as a quick primer for a newcomer wanting to learn
some basic skills. More details can be found in the books for
teaching young orienteers listed in the resources section. Orienteering vendors have
vast collections of literature, materials and equipment for teaching
and learning orienteering.
Of course, the best way to learn or teach orienteering is
to do it, so by all means get out onto a map! An orienteering
event organized by a local orienteering club can often be the
best way to get a good suitable course and map, and yield a rewarding
experience.
I'll start with skills for very young children. Older children
and adults may want to start with adult courses, but be sure
the basic skills are taught: orienting the map, understanding
the map symbols, and so forth.
Getting used to the forest
Younger orienteers may want to do activities to get used to
being in the forest, to help their self confidence and sense
of security. String orienteering courses are helpful for this,
since they eliminate the risk of getting lost. So are other activiies
and games done in the woods.
What is a map?
One way to think of a map is as an aerial view. But for younger
children, the concept of a map as a drawing of the forest may
be more easily understood. An intuitive understanding of a map
is a good base from which to build on later with more formal
concepts.
Frequent exposure to maps helps build a sense of familiarity.
Foster this by asking simple questions about the map. If the
map is colored, quiz the child on what the colors mean -- yellow
for clearing, blue for water and so on. Talk about places being
far apart (or close together) since they are far apart (or close)
on the map. It may be good advice to not get too complex too
soon; the child may not yet be ready. Maps are a wondefully intuitive
and yet sophisticated concept that children will grasp when they
are ready.
Simple exercises include having children draw a map of a small
area. This can be as simple as making a drawing of a room or
a field, or as fromal as measuring a room or field and the objects
within and drawing them all to scale on graph paper. Choose the
level of sophistiction suitable for the child.
If you discuss contours or topography at this stage, it may
be good to start simple. Simple concepts to start with include
hilltops (shown by closed contours, and the difference between
steep areas (where contours are close together) and flat areas
(where there are few or no contours).
Reading a map
Lead the children out on a map walk reading the map. Point
out features as you go along. Ask the children to anticipate
what features they will be seeing next by reading the map.
Orienting a map is an important skill. Turn the map until
what is in front of you in the terrain is in front of you on
the map. If you are facing east, then the east side of the map
should be away from you. Don't worry if the lettering on the
map is sideways or upside-down. Practice keeping the map oriented
while on a map walk.
Thumbing is also a useful technique. Fold the map into a small,
easily held piece and hold your thumb on the map near where you
are. Keeping your thumb near where you are as you go along makes
it easier to refer back to the map when you take your eyes off
it. It also reduces the chances of your eyes “skipping”
to another part of the map, say, to another trail junction. This
is an easy error to make.
An example of a map reading exercise is to have the children
do a String orienteering course. Mark the route on the map for
them but don't show where the controls (checkpoints) are. As
the children come to each control, have them mark where they
are on the map. This will teach them to read the map and figure
out where they are.
Learning to navigate
Navigation is the quintessential skill of orienteering, and
it will take time to master. Be sure to teach (or learn) it progressively
in small steps, allowing for success at each stage. Children
may also still want to do the String course as well as they advance
to adult navigation, which is good, since String courses often
serve a social function as well, and help reinforce a sense of
success.
Navigating along linear features
Once children can find their location on a map, the next step
is to start finding their own way on an unmarked route...in other
words, on a standard orienteering course. At first, do the navigation
together.
The first type of standard orienteering course for a child
to do is one on linear features, such as trails, with only one
decision to be made on each leg. (See Learn the language). For instance, each control
might be on a trail junction, but there should not be any trail
junctions between controls. At each trail junction the child
need only decide which way to go, This is easier than a typical
White course, which is the easiest standard course usually available.
You may need to improvise:
If you set the course yourself, use a small, well bounded
area. If you want to use a normal White course, try to pick an
event at an area that tends to have easier White courses, such
as a small park. Or, if the course is hard, have the child do
the navigation for some of the easier legs and do the harder
legs together.
Don't worry about choosing the best route or the fastest way,
just successful navigation. Route choice tends to improve with
experience.
After children master simple linear navigation, they are ready
for a more typical White course, where they will make multiple
decisions on each leg. Follow them along at first, letting them
navigate but keeping them from making big mistakes. Later, let
them do the course alone.
At some point, teach a second technique for orienting the
map: using a compass. Hold the compass on the map. Ignore all
settings, dials and gadgets. Turn the map (not the compass) until
the compass needle is parallel to the north lines on the map,
with the red end of the needle toward the north end of the map.
(The compass needle always points to north (magnetic north, to
be specific), so turning the compass will leave the compass needle
always pointing the same way.) Now the map will be oriented with
the terrain, just like when you oriented it before.
Practice map reading while on White courses. While going along,
have the child read what other features should be alongside the
trail, and verify that these are there as you pass them. Also,
practice relating disctances on the map to distances on the ground.
For instance, how far will the next feature be?
Off trails
The next more difficult course is Yellow. The Yellow course
generally goes along trails and other linear features, but often
has controls on features just off the trail.
Now it becomes important to plan a method of finding a control,
not just picking which trail to take. Often this involves an
“attack point,” which is a feature, such as a bend
in the trail, or a pond by the trail, or a hilltop, or such,
at which you will head offf the trail to find the control. Ther
times it may simply involve knowing when to look for a small
hill or cliff near the trail. In any case, it is important to
plan ahead.
Route choice starts to become important. At this point emphasize
routes that provide the most sure way to find a control, rather
than the fastest or shortest way. Consider factors such as whether
there is a feature (“catching feature”) to let you
know if you have missed what you are looking for. Is there a
good atack point on this route? Is the navigation easy or hard?
Are there lots of chances for wrong turns?
Compass bearings could now be taught:
 Place the edge of the compass
on the map so that it goes from where you are to where you want
to go. (So, the edge of the compass forms a line connecting where
you are on the map and where you want to go.) In the diagram
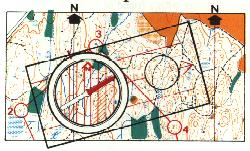
above, a compass bearing is being taken from a trail bend to
control point 3. (A trail is shown by a dashed black line; a
red mark has been made on the diagram to point out the trail
bend.) Make sure that the direction of travel arrow at the top
of the compass is pointing in the direction you want to go, and
not in the reverse direction.
Place the edge of the compass
on the map so that it goes from where you are to where you want
to go. (So, the edge of the compass forms a line connecting where
you are on the map and where you want to go.) In the diagram
above, a compass bearing is being taken from a trail bend to
control point 3. (A trail is shown by a dashed black line; a
red mark has been made on the diagram to point out the trail
bend.) Make sure that the direction of travel arrow at the top
of the compass is pointing in the direction you want to go, and
not in the reverse direction.
 Holding the compass in place on
the map, and ignoring the needle for the moment, turn the dial
so that the lines in the housing line up with the north lines
(meridians) on the map. Make sure that the N on the dial is towards
the north (and not south) end of the map. (This is subtle in
the above diagrams; look to be sure you see it.)
Holding the compass in place on
the map, and ignoring the needle for the moment, turn the dial
so that the lines in the housing line up with the north lines
(meridians) on the map. Make sure that the N on the dial is towards
the north (and not south) end of the map. (This is subtle in
the above diagrams; look to be sure you see it.)
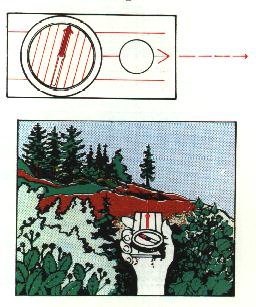 Leaving that setting alone, turn
yourself and the compass and map until the red end of the needle
points to the N on the dial. (Remember, the needle doesn't turn
(it always points north). You and the compass and map turn around
it. This takes a bit to get used to.) The direction of travel
arrow on the compass now points in the direction you want to
go.
Leaving that setting alone, turn
yourself and the compass and map until the red end of the needle
points to the N on the dial. (Remember, the needle doesn't turn
(it always points north). You and the compass and map turn around
it. This takes a bit to get used to.) The direction of travel
arrow on the compass now points in the direction you want to
go.
Illustrated instructions are often included with orienteering
compasses. Remember that the most important use of a compass
is still to orient the map. And remember, reading the map is
still important too!
At this stage, an orienteer is probably ready to make a very
simple map of a small area, such as a schoolyard. This is excellent
training for both map and compass skills, and will reinforce
almost everything taught to this point. An orienteering training
camp might also be useful and fun. More advanced skills can be
found in several of the books listed in the Resource section.